Installation
Install and configure the BeyondWords WordPress plugin
Generate Audio
Create audio for new and existing posts
Categories
Control audio generation by category
Player
Configure the BeyondWords Player
Sidebar
Access advanced audio options
Languages
Configure multiple languages
Install the plugin
- Install BeyondWords-Text-To-Speech from the WordPress plugin marketplace.
- Activate the plugin and open the plugin Settings.
- Enter your API Key and Project ID in the Credentials tab.
- These can be found in Project > Settings > Integrations > WordPress.
- Save changes.
Audio Generation
With the plugin installed, each published article is automatically converted to audio, with the player being prepended to the top of your posts body.For new posts
- Ensure the plugin is installed correctly.
- Publish your post
- Audio generation will be triggered within BeyondWords (can take a few minutes, depending on length)
- Once the audio is generated the BeyondWords Player will be prepended to the body of your article.
For previous posts
- Navigate to the All Posts section in the WordPress dashboard.
- Select all previous posts you want to generate audio for.
- From the Batch Actions dropdown menu select Generate Audio and click Apply.
- Selected posts will be sent for audio generation
- The BeyondWords Player will be added to your article once generation is complete.
BeyondWords plugin Settings

Plugin and BeyondWords dashboard settings will sync automatically.
Content
The Content Section allows you to control which parts of your content are converted into audio.Integration method
REST API
This is the default setting for the plugin, audio generation is built on top of our API. It’s the most stable option for most WordPress users and the recommended choice to start with. If you are having issues using the REST API and are using a page builder such as Elementor we would reccomend trying the Magic Embed integration method.Magic Embed
This option is designed for users who are using themes or page builders that may cause the REST API to not function as expected. It injects the Magic Embed script directly onto your WordPress pages, running after the page is built.For this to work correctly, Magic Embed must be selected in the plugin and configured within your BeyondWords dashboard.
Auto-publish
With auto publishing enabled, audio is published as soon as it’s generated.If disabled, audio must be manually published from the BeyondWords dashboard.
Generate Audio by Category
You can choose to have the Generate Audio checkbox in the editor deselected by default for certain categories.- Uncheck “Posts/Pages” to reveal the category list.
- Check the categories you want to automatically generate audio for.
- Only posts in the selected categories will generate audio.
If a post belongs to both a selected and unselected category, audio will still be generated.
Voices
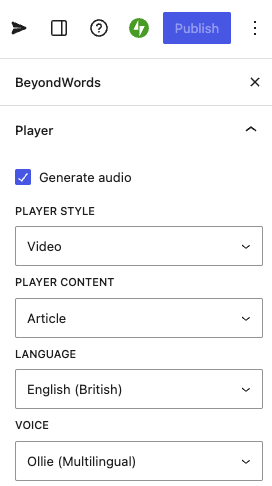
In the Voices tab, you can select your article language and preferred voice. You can also manage your voices directly in the BeyondWords dashboard, where you’ll find sample audio clips to preview each option.Player
Headless mode
The BeyondWords plugin now includes a headless mode, meaning a publisher can take advantage of audio processing and the audio CMS whilst building their own front-end players. Once in headless mode you can build your own UI on top of the player.Player style
You can set the default player style for all future generated posts. The available options are Standard, Small, Large, and Video.The Video player option is only available if video generation is enabled in your BeyondWords Dashboard.
Widget
The player widget is a compact, floating audio player that appears when a user scrolls away from the main embedded player. It keeps essential controls visible and accessible, even as the user navigates around the page. You are able to set the widget style and position within the plugin or within the BeyondWords Dashboard.Summarization
Summarization can be toggled on or off from within the BeyondWords dashboard. The tab in the plugin will redirect you back to the dashboard settings. For full details, please visit our dedicated summarization section.Pronunciations
Pronunciation rules can be added or set from within the BeyondWords dashboard. The tab in the plugin will redirect you back to the dashboard settings. For full details, please visit our dedicated Pronunciation rules section.BeyondWords Sidebar
The BeyondWords sidebar is available on the post edit screen and allows you to configure advanced audio options on a post-by-post basis.